
Which anchor should you choose for a wall-mounted bottle rack?
A bottle rack that holds about a hundred bottles, two anchors, a wall made of hollow concrete blocks. This topic comes up regularly on DIY forums, and always in the same order: first the purchase, then the question about the wall. Sometimes accompanied by a photo of a hole that has gotten bigger on its own.
The problem rarely lies with the shelf itself. A 2-mm steel frame can handle whatever is asked of it. What gives way is the point of contact between the screw and the material hidden behind the plaster. On concrete, just about anything works. On standard drywall or hollow brick, the anchor becomes the only component that matters in the entire assembly.
Here's how to identify your wall and then the appropriate mounting hardware.
The wall determines the type of anchor, and the shelf doesn't change that
Two customers buy the same wall storage system on the same day—one in an older building with solid walls, the other in a newer house with drywall partitions. Same structure, same screws, and two wall anchors that have nothing in common.
An anchor is chosen based on the material in which it is embedded, never based on the object it supports. A solid wall surrounds it on all sides. A hollow wall offers it only a few millimeters of wall thickness and empty space behind it. Two opposing mechanisms, two product families.
"Universal anchors" add to the confusion: they're useful on many surfaces, but never on all of them.
How much weight your wall can support once the bottles are in place
An empty wine rack doesn't reveal the problem. On the day it's installed, everything fits. The problem arises later, as the collection grows: the Bordeaux bottles, then the Burgundies, then the magnums saved for family dinners.
Two factors are sufficient to determine the size of the fastener, and neither requires any calculations.
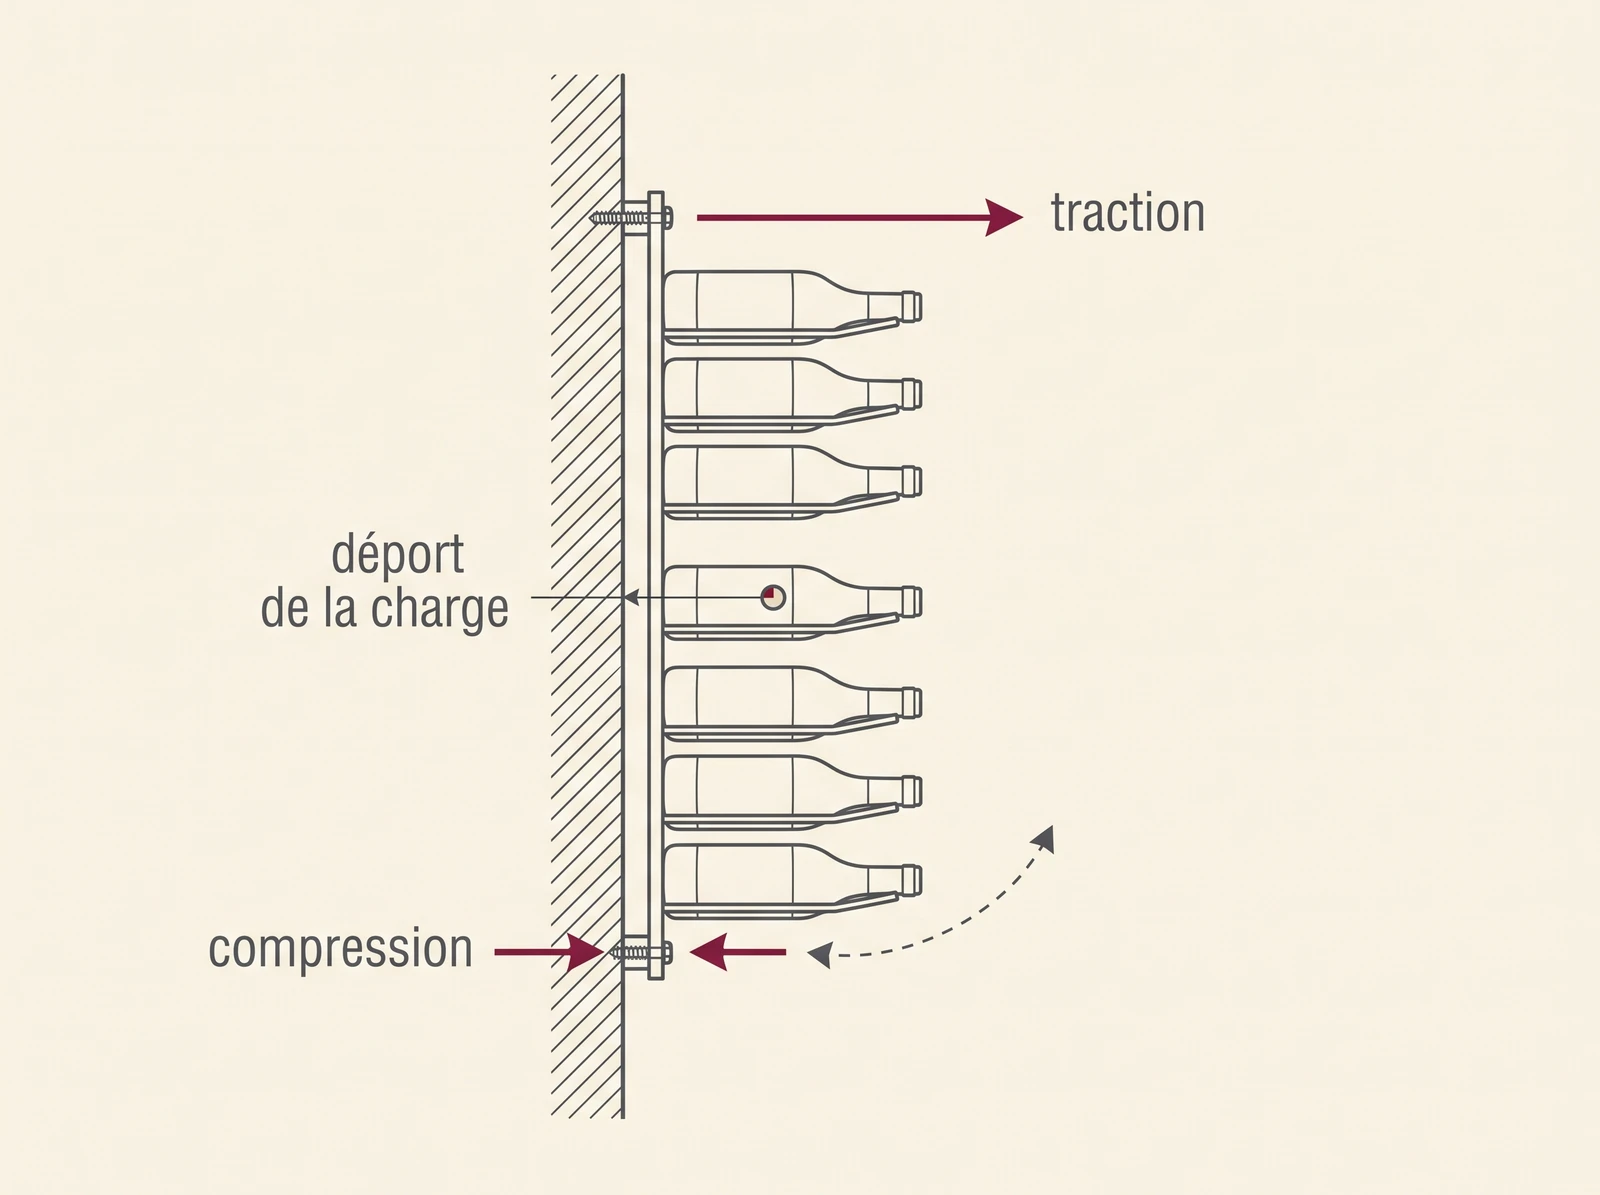
The direction of the force. A heavily loaded wall shelf does not pull the anchor toward you in a straight line. It first pulls downward along the wall, creating a shear force—in other words, a force that acts across the screw. In solid materials, most anchors handle this well. On drywall, however, this same force eventually tears the drywall around the hole. The rest comes from the offset. A bottle lying on its side protrudes several centimeters from the wall’s surface, and its weight acts as a lever. The structure tries to tip forward, pivoting on its lower section. This tilt pulls the upper fasteners outward—a phenomenon manufacturers call “pull-out”—while the lower fasteners are compressed against the wall.
Practical implication: The points mentioned above should never be overlooked, and a deep bottle rack (for magnums or double-deep horizontal bottles) places a greater load on the wall than a narrow column with the same capacity. The farther the load is from the wall, the longer the lever arm.
The margin. When selecting a fastener, choose one that’s slightly larger than what’s needed. If you’re torn between two anchor diameters and the wall can handle it, go with the larger one. The price difference is just a few cents, but the damage from a failed anchor could cost you a few bottles.
How many mounting points should be provided?
Never just one, and rarely two. This issue comes up regularly on forums: a large-capacity bottle rack, two anchors, a hollow wall. The load is concentrated on two tiny areas of material, and the rack gives way at the wall before giving way at the anchor.
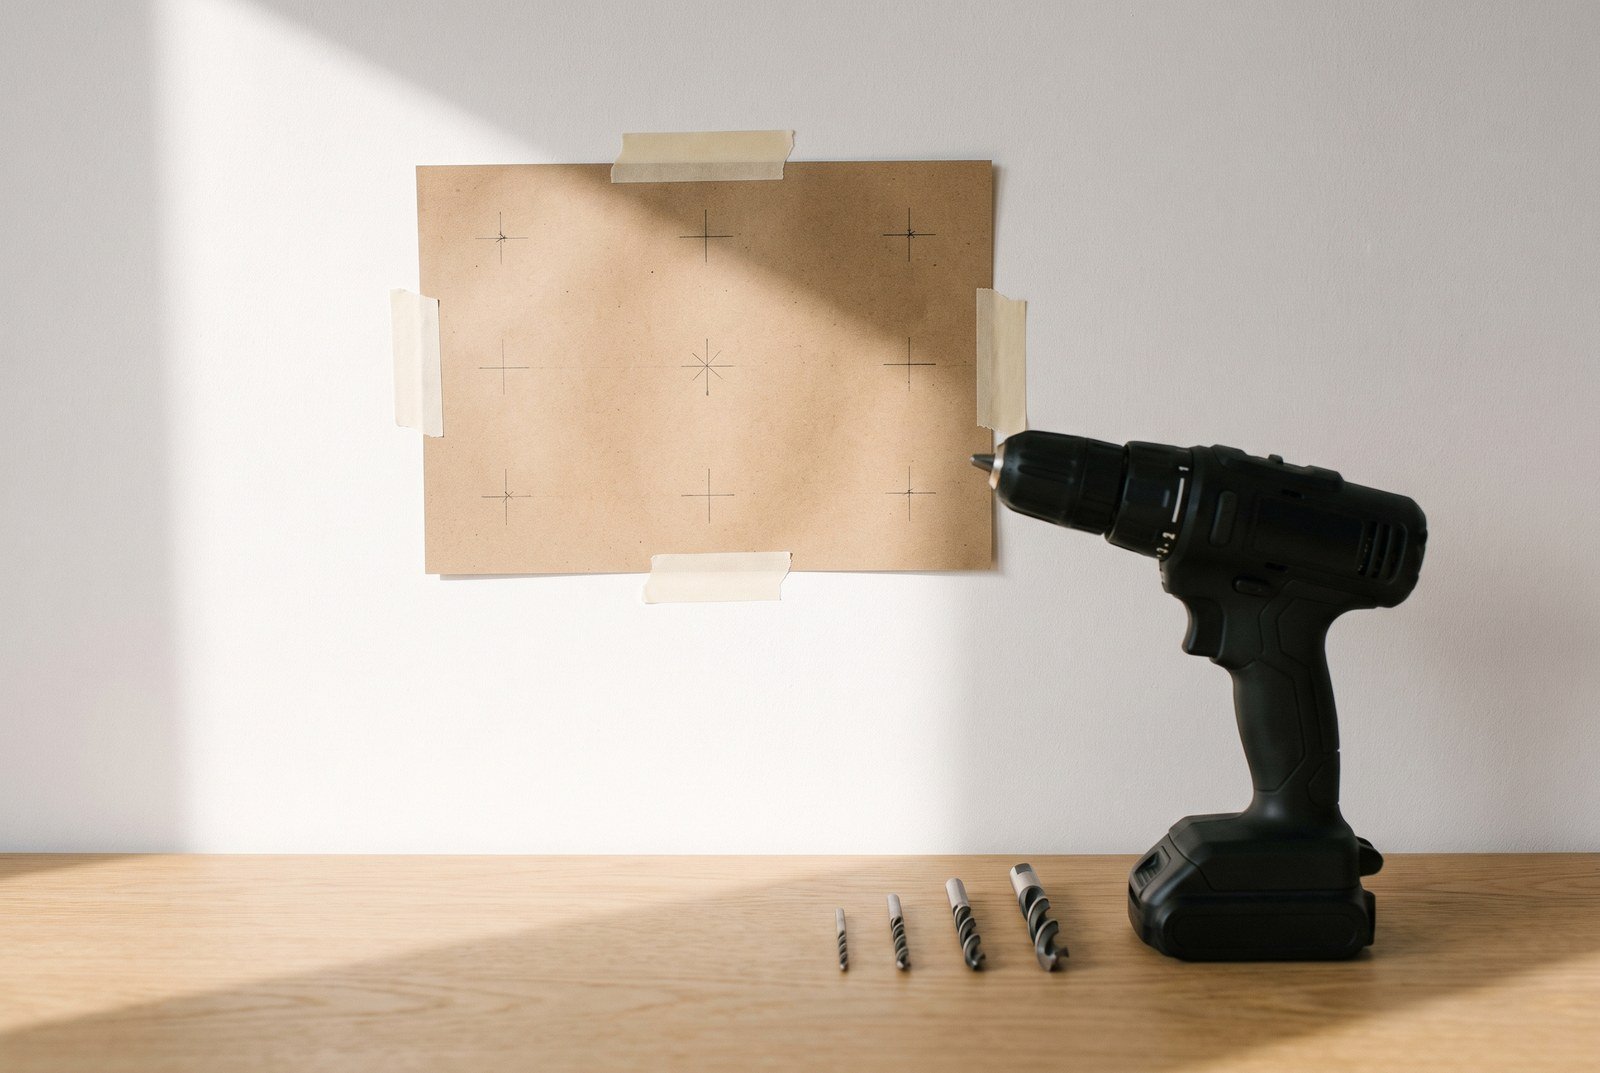
Here’s a useful rule that can be summed up in one sentence: use all the holes specified by the manufacturer. A drilling template is meant to distribute the force evenly—it’s not a suggestion for layout.
And if you add more anchors, space them out. For drywall, manufacturers recommend at least 40 cm between anchors. In solid walls, stay away from edges, corners, and joints. Two anchors that are too close together put stress on the same area of the wall and do not add up: two Molly anchors 10 cm apart are not twice as effective as a single Molly anchor.
When it comes to a hollow or worn-out wall, my opinion is clear: use well-spaced anchors or a panel reinforcement, rather than relying on a single, over-reliant anchor meant to compensate for a weak surface.
The chart to check before checking out
Four columns, and your decision is made. The “capacity” column gives you a general idea, keeping in mind that the wall’s actual condition always takes precedence over its category.
| Wall Type | Reasonable capacity | Recommended anchor | Screw |
|---|---|---|---|
| Concrete, solid brick, solid cinder block | Complete module consisting of double shelves and several columns side by side | Nylon expansion anchor (Ø 6 or Ø 8), or universal anchor | 5 × 50 mm screw |
| Hollow brick, hollow concrete block | A complete module, provided that the number of anchor points is increased | Long multi-expansion anchor for hollow materials, or chemical anchor with screen | 5 × 50 mm screw |
| Aerated concrete (such as Siporex or Ytong) | Full module if the material is sound and the points are well distributed | Special anchor for aerated concrete, or aerated concrete screw | Screws designed for wall anchors |
| Standard drywall (BA13, without reinforcement) | A minimalist setup with single-shelf units, designed for serving wine rather than aging it | Metal Molly Expansion Anchor | Metric screw included with the Molly |
| Gypsum board with 22 mm MDF or OSB reinforcement | Complete module, provided that the reinforcement is screwed into the studs: it is the framing that bears the load, not the panel | No anchors; screws are driven directly into the reinforcement | 5 × 50 mm screw in the reinforcement |
| Lining Glued to Insulation | Simplified if the anchor remains in the sheathing; complete if it is attached to the load-bearing wall | Special anchor for insulation backing, or through-wall anchor extending to the load-bearing wall | Specialized fasteners, or screws of a length appropriate for the depth of the mounting surface |
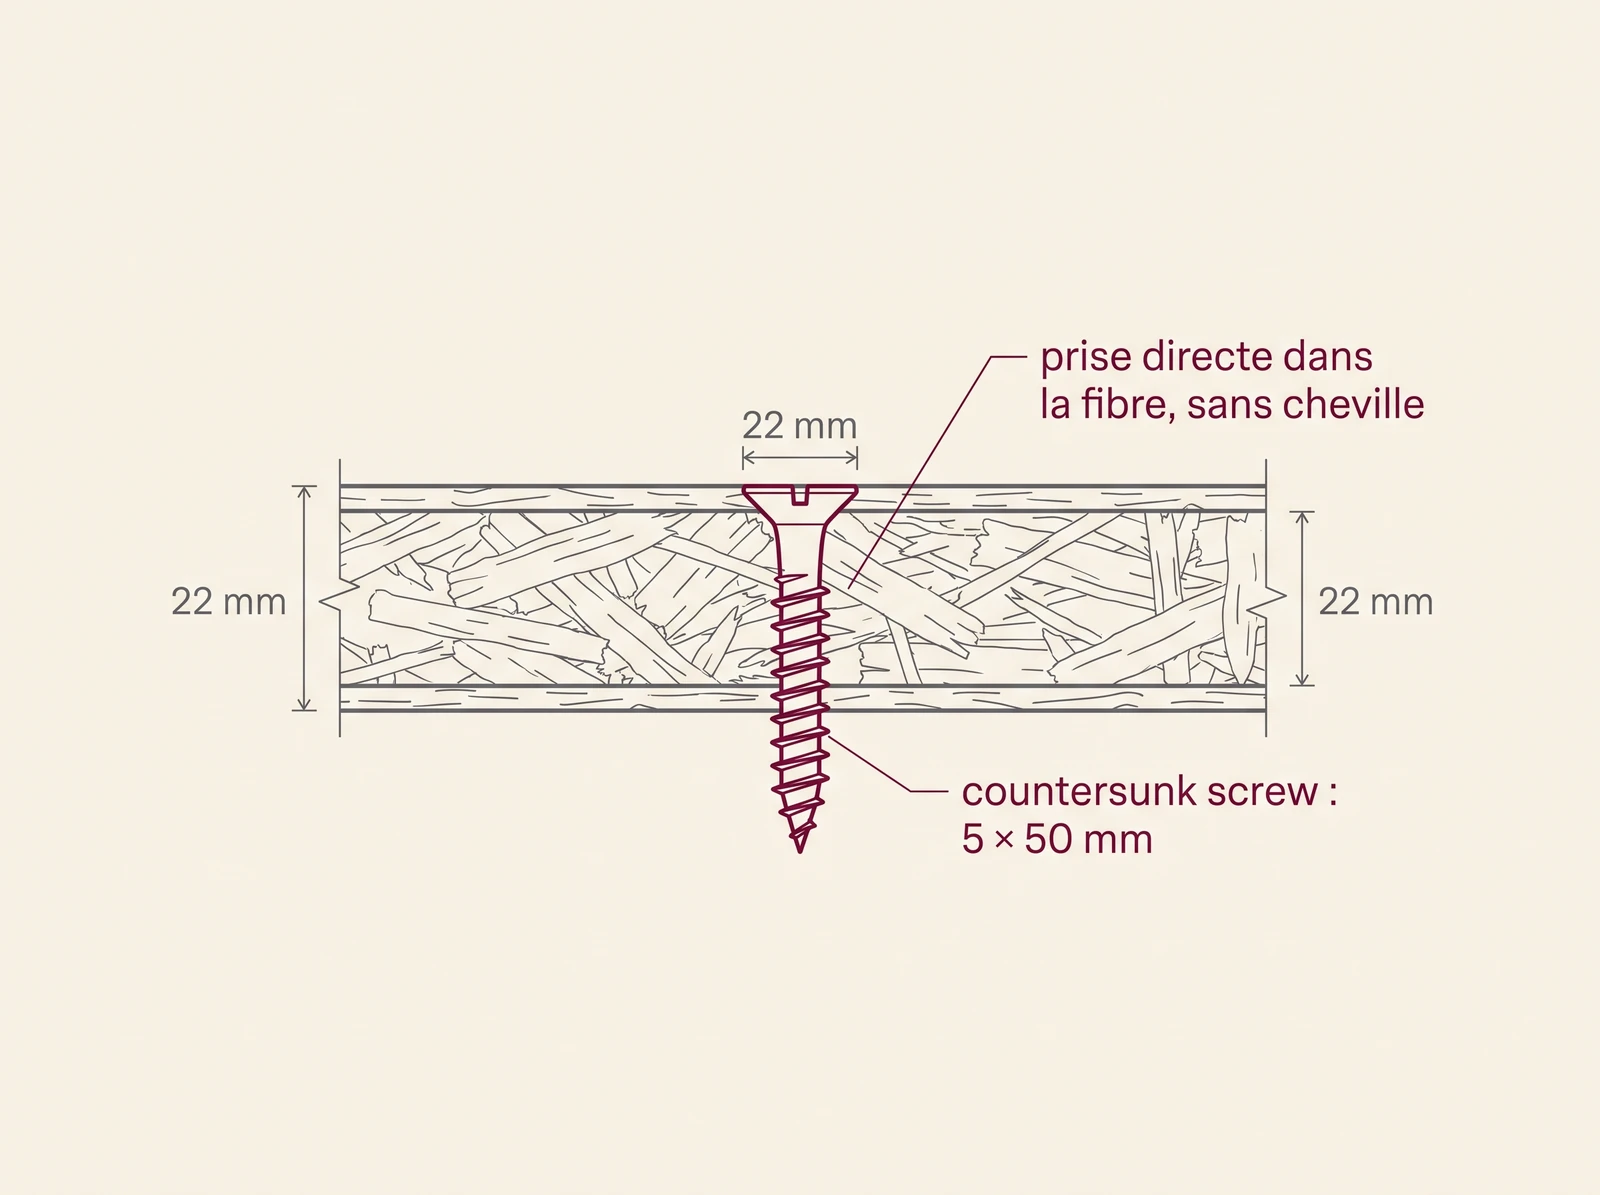
| Solid wood, wood-frame construction, 22 mm OSB | Complete module; the fastest to install of the bunch | No pegs | 5 × 50 mm screw |
| Steel framing (studs) | A useful support, but never the primary anchor for a solid column | No anchors, or anchors designed for metal framing | Fine-threaded self-tapping screw for metal |
| Plasterboard, solid or honeycomb | Streamlined configuration, after verifying the thickness and type | Special drywall anchor, or through-wall fastener if access permits | Screws supplied with the anchor, or through-bolt with a load-distribution plate |
For all partitions, the 40-cm center-to-center spacing mentioned above remains the requirement for the points to be added together. And as soon as a solid column is targeted, the reinforcement takes precedence over the multiplication of anchors.
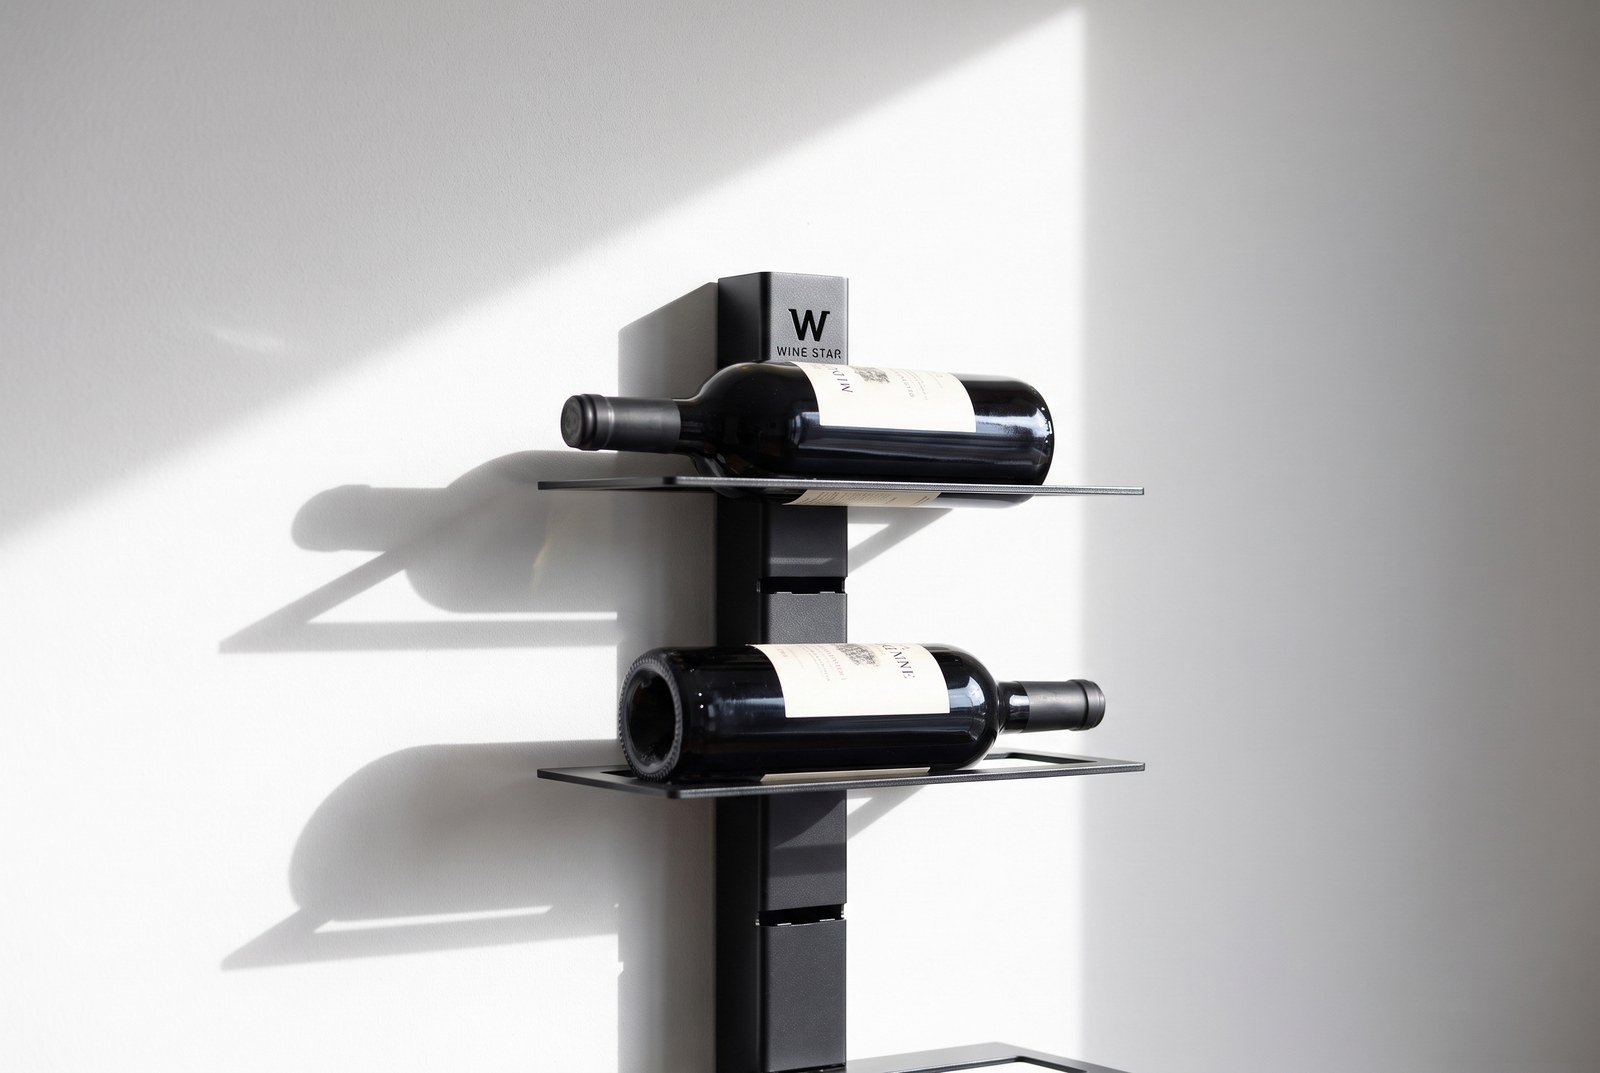
A Wine Line® module can hold up to 11 bottles on single shelves and up to 22 on double shelves, including magnums and champagnes. A solid wall can easily accommodate this configuration. A hollow partition can also support it, provided the weight is distributed properly, which brings us back to the original question: what is this wall made of?
How can you tell which wall it is when you can't see anything?
Under the paint, all the walls look the same. Four checks, done in order, clear up any doubt in two minutes, and the first one requires nothing more than a screwdriver.
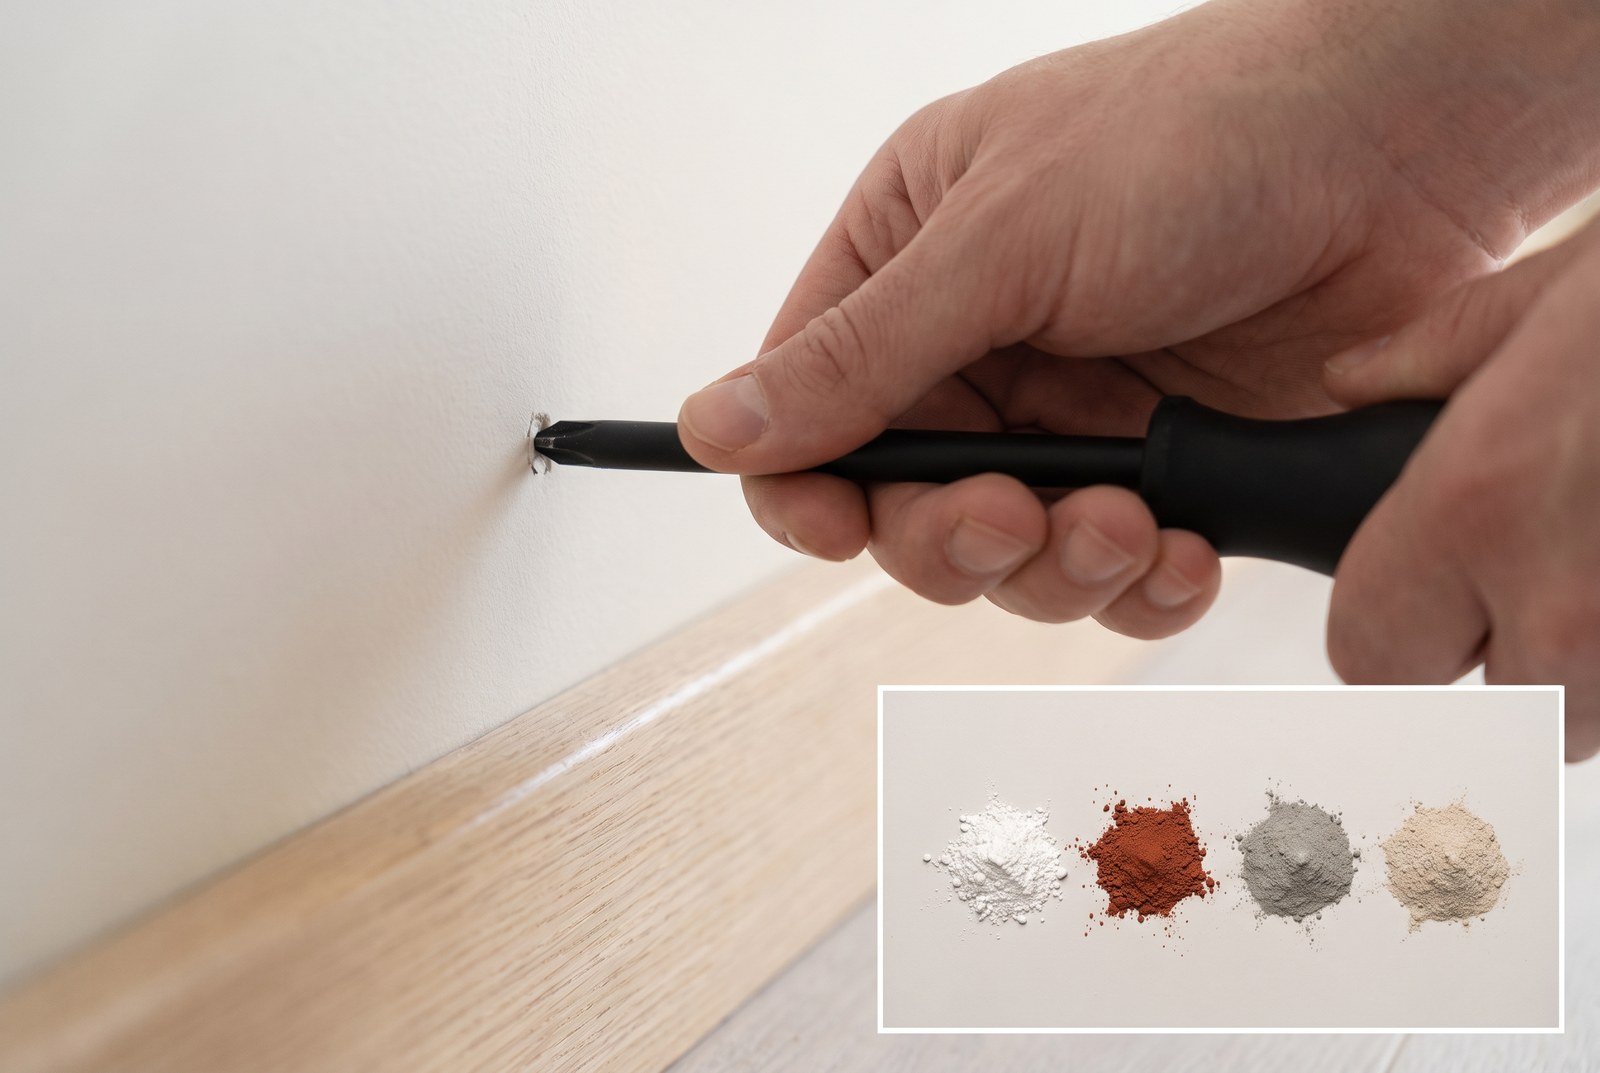
The screwdriver test. Choose an inconspicuous spot, behind a piece of furniture or in a low corner. Press the tip of a flathead screwdriver against the surface and push firmly, without tapping.
If it sinks into a soft material that crumbles into white powder, there are three possibilities, not two: drywall, plaster tile, or plain plaster applied to a solid masonry wall. If it penetrates more than 15 mm without encountering anything hard, it is definitely a plaster partition. This is the most common false positive in this test—the one that leads to a Molly being placed in solid brick.
If it leaves a scratch without penetrating the surface, the material is hard: concrete, brick, or cinder block. Note that this test only indicates surface hardness and nothing else. A plastered hollow brick scratches just like concrete, even though the two require different types of anchors. Only the sound and, above all, the drilling process will provide a definitive answer.
If it bites and leaves shavings, it's wood or a wood-based panel.
Sound. Tap with the knuckle of your finger on several spots spaced about 30 centimeters apart. A dull, muted sound indicates solid wall. A hollow, resonant sound indicates a partition, with sharp, crisp echoes at regular intervals where the studs are located.
The magnet. Run a magnet along the wall. If it sticks in regular vertical strips, you’re dealing with drywall mounted on a metal stud frame, and those strips are the studs. The track, on the other hand, runs horizontally at the top and bottom of the wall—there’s no need to look for it halfway up.
Drilling dust. The most reliable test comes last, at the first hole. Light, white powder: plaster. Gray dust: concrete or cinder block. Red or ochre dust: brick. Wood shavings: wood. The color indicates the material family; the resistance you feel tells you the rest. Concrete continuously slows the drill bit down; cinder block gives way in jerks; aerated concrete drills through almost effortlessly while producing the same white dust as plaster. And if the drill bit suddenly shoots forward after one centimeter, you’ve just pierced the wall of a hollow material.
Wall by wall: the anchor that holds
On drywall, Molly Metal does the job
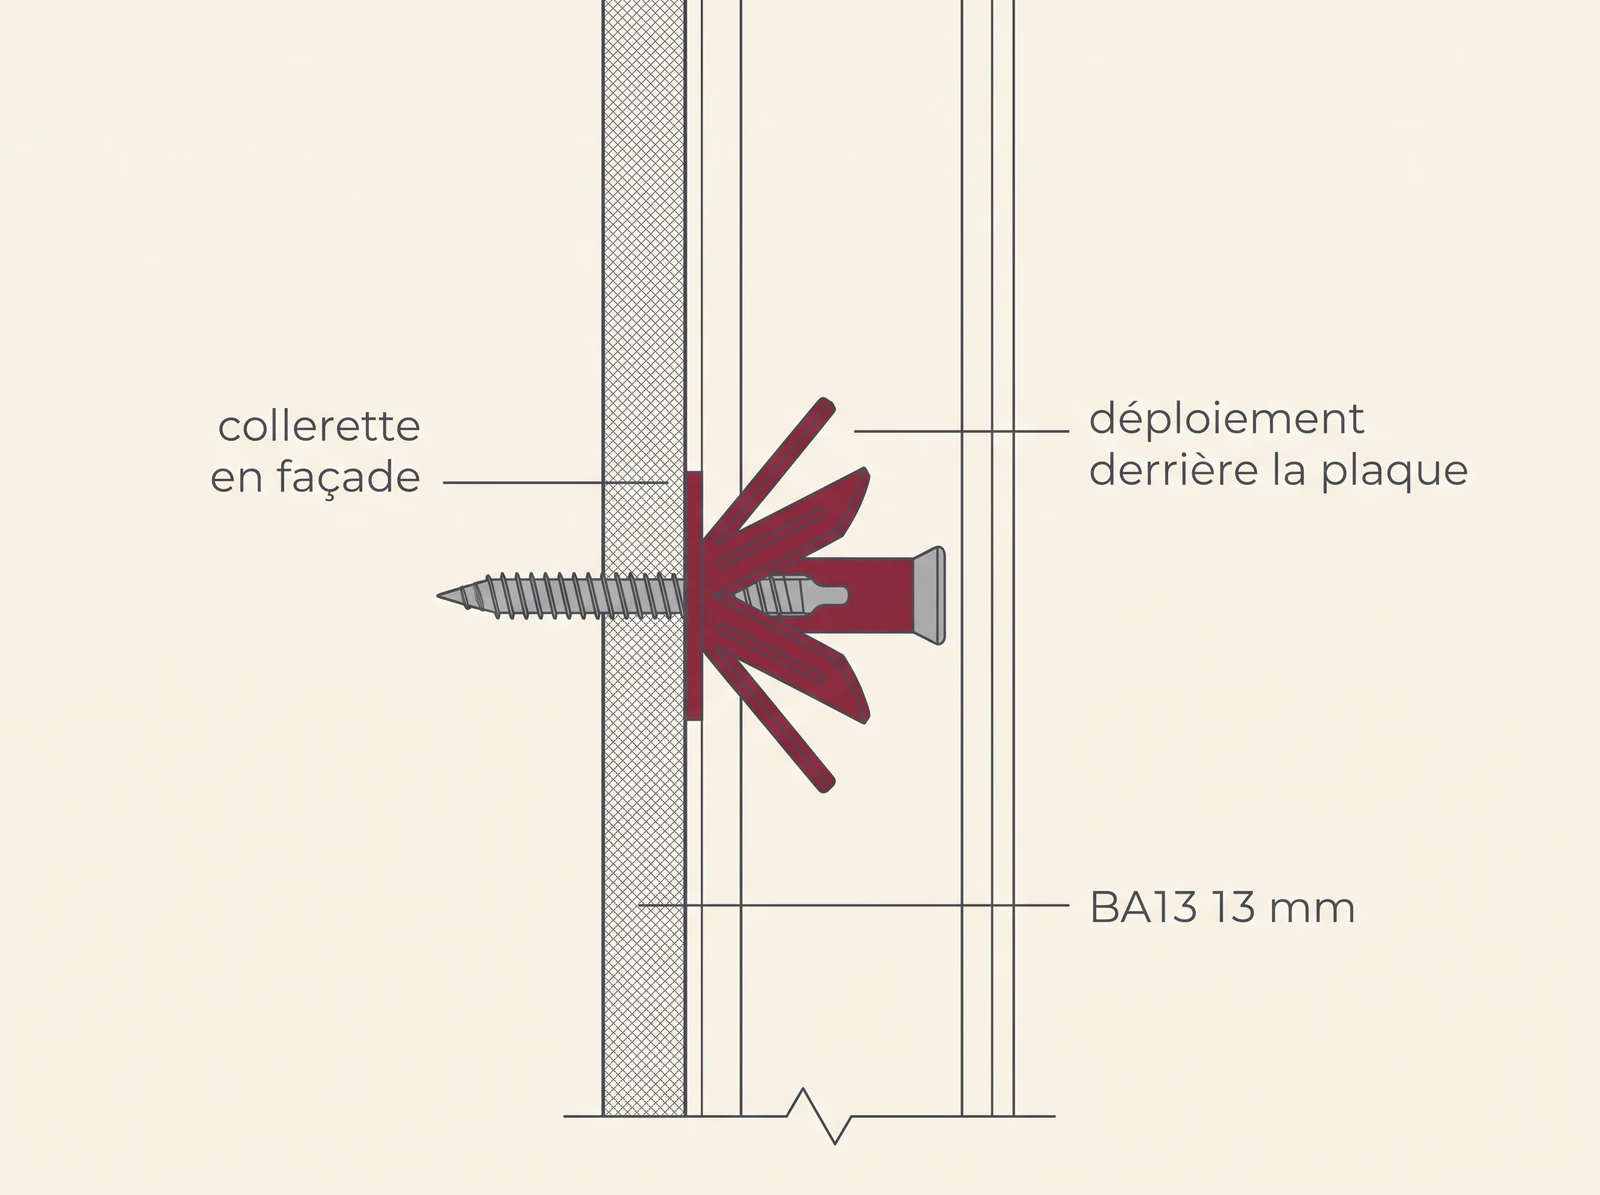
Standard drywall is 12.5 mm thick (the “13” in BA13 is a marketing rounding) and doesn’t hold anything in place. A standard nylon anchor spins in its hole as soon as a load is applied. The solution is the Molly anchor: a metal body that expands behind the drywall and clamps it between its flange and wings. The load is then distributed across the drywall instead of concentrating on the edge of the hole.
Two precautions. The Molly screw must be expanded with pliers before final tightening; otherwise, it will spin. And if a metal stud runs behind it, it can serve as a support, but not with a wood screw: the sheet metal is 0.6 mm thick, and the coarse thread will strip when tightened. You’ll need a self-tapping screw with a fine thread for metal, or an anchor designed for metal framing. On a wooden stud, however, screwing directly into it remains the best option.
For a full-height column, bracing is the recommended solution: a 22-mm MDF or OSB panel screwed into the studs, followed by the shelf screwed into the panel. The load is then distributed throughout the framing rather than resting on the drywall. This topic is covered in more detail in our guide to fastening to drywall.
Hollow bricks and hollow concrete blocks: the pitfall of thin walls
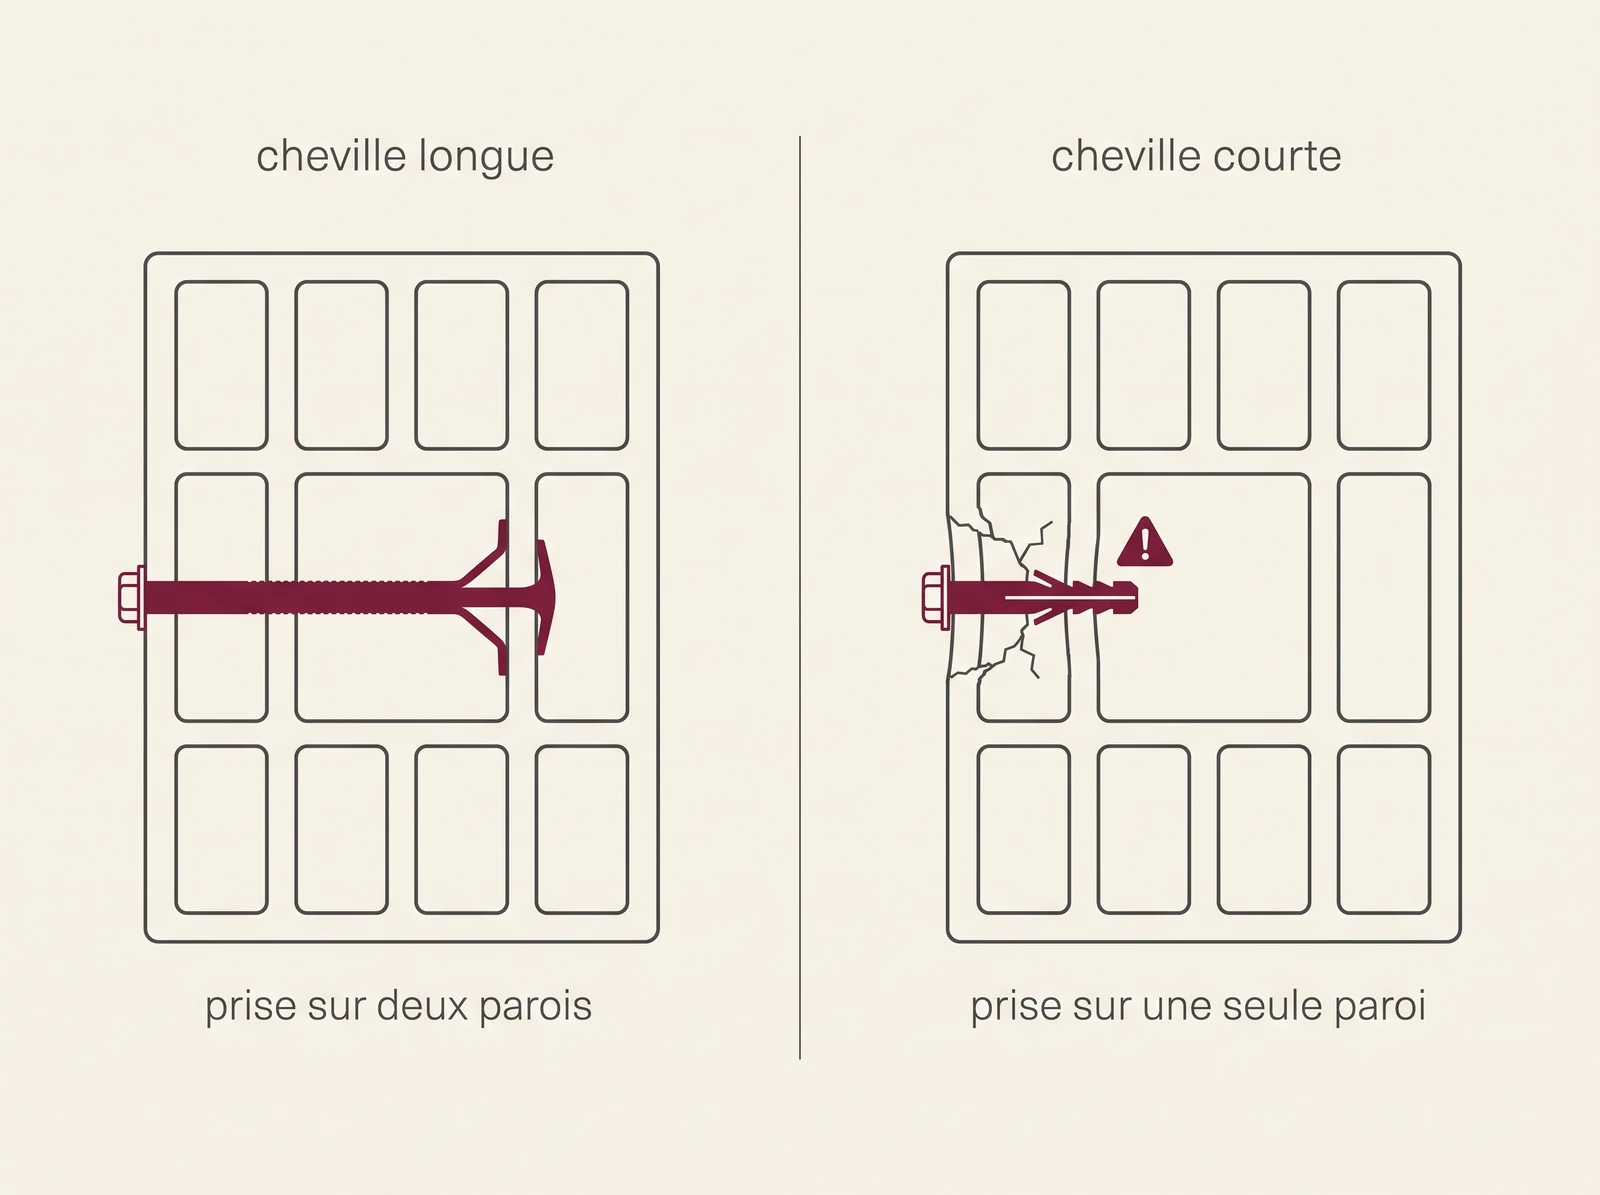
The most common case—and the one most often handled incorrectly. Behind the plaster, a hollow brick consists of only a wall a few millimeters thick, followed by an empty cavity, and then another wall. A short anchor bolt is embedded in a single layer of terracotta, which breaks cleanly under the force of leverage.
There are two viable solutions. The long, multi-expanding anchor, which expands into several successive cavities and anchors to multiple walls at once. Or chemical anchoring with a screen, in which the resin anchors behind each wall and forms a mechanical lock. For a hollow concrete block that has to support an entire basement, that’s the choice I make.
Before injecting, blow out and swab the hole. The resin does not adhere to dust, and a poorly cleaned hole loses more than half of its strength. This is the leading cause of failure in a filling.
Always drill using rotation only. The hammer action shatters the internal walls of the brick and turns a clean hole into a crater.
Solid walls: concrete, solid brick, solid cinder block
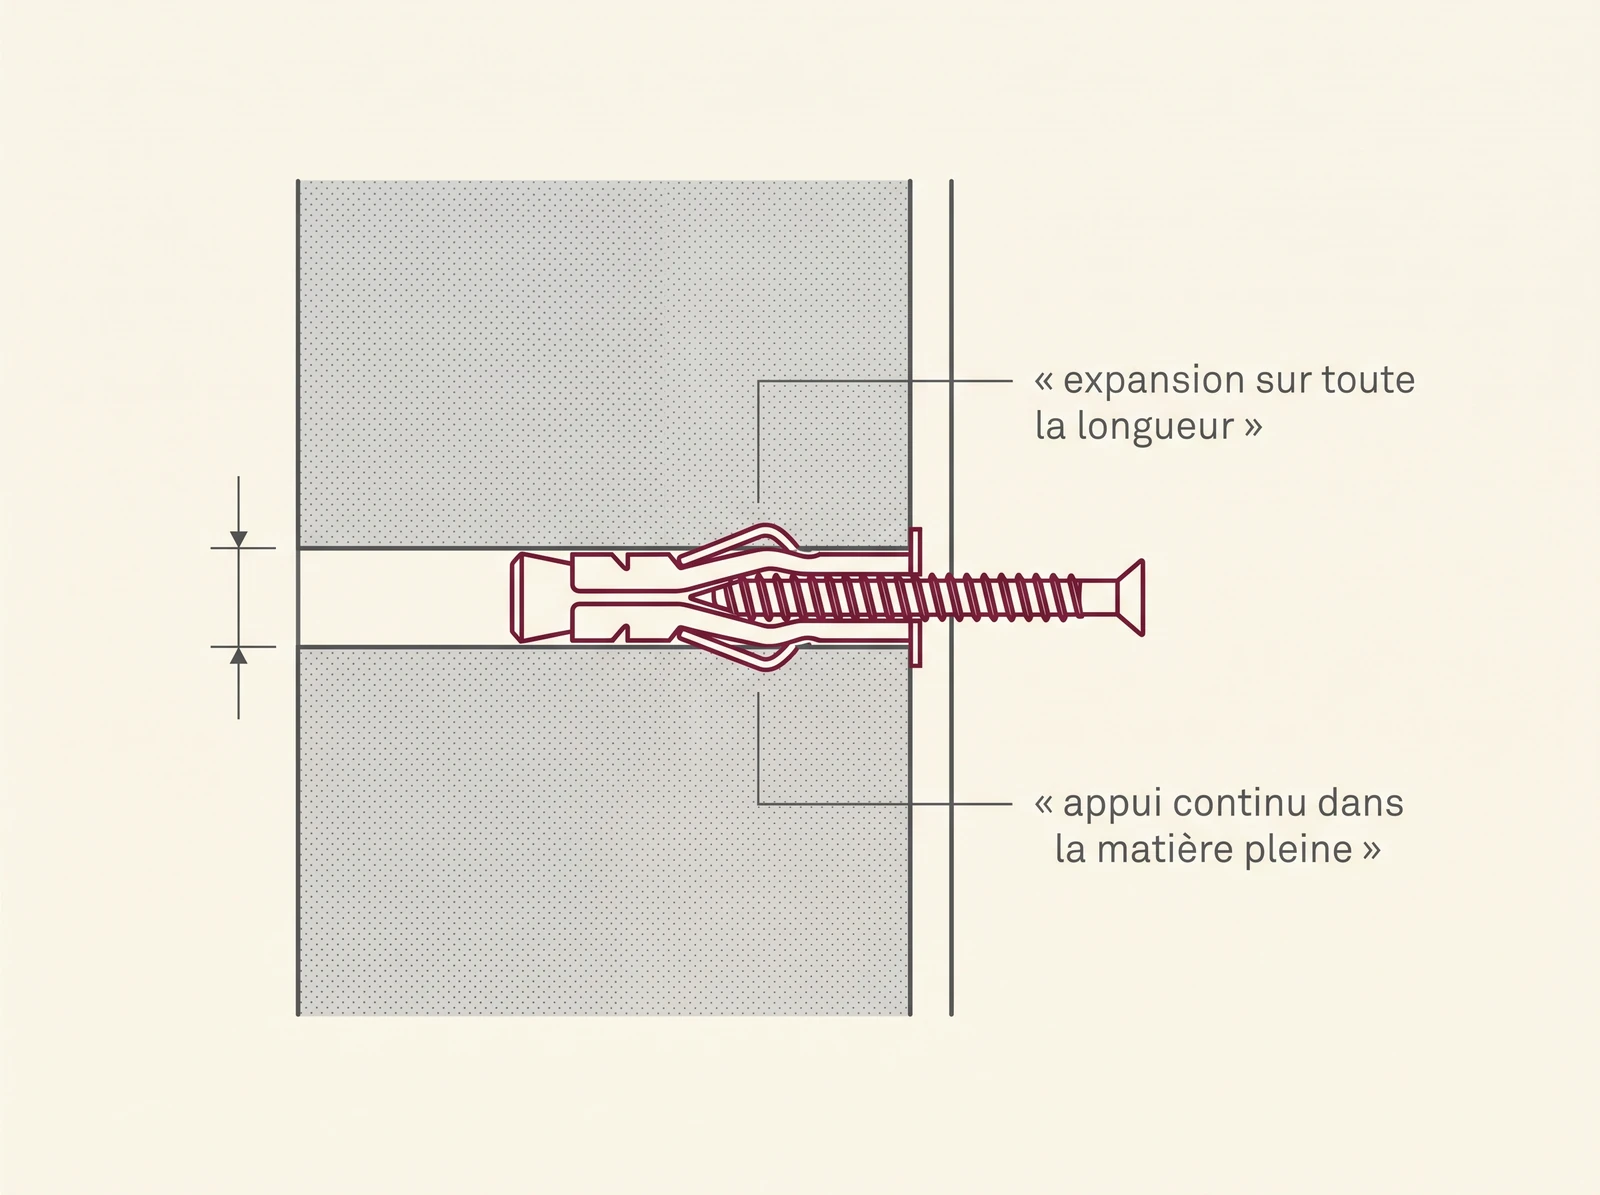
A secure fit. The material grips the anchor along its entire length, and the expansion mechanism functions properly. A Ø 6 or Ø 8 nylon expansion anchor with a 5 × 50 mm screw is more than sufficient.
Two caveats. When drilling into hard concrete, use the hammer drill setting with a concrete drill bit, and change the bit as soon as it stops advancing. And when drilling into an old solid wall, be careful of the joints—a point discussed below.
Bonded Sheathing and Aerated Concrete: Two False Friends
Two very common configurations masquerade as something else during testing.
Insulation-backed drywall, a common practice since the 1980s: a sheet of drywall attached with adhesive dots to polystyrene, which is itself attached to the load-bearing wall. The drill bit goes through the drywall, then through the insulation, and a standard anchor is secured in the foam. You need an anchor designed for insulation-backed drywall, or a through-wall anchor that reaches the load-bearing wall behind it.
Aerated concrete, on the other hand, produces the same white powder as plaster. It can be identified by its low resistance to drilling and requires its own wide-threaded anchors. A nylon expansion anchor will not hold in it.
Wood and OSB: Forget the anchor
In solid wood, a wood-frame stud, or a 22-mm OSB panel, a wall plug serves no purpose and actually weakens the hold. The screw bites directly into the grain. Drill a pilot hole with a diameter smaller than that of the screw to prevent splitting the wood, and then drive the screw in.
This is the fastest installation method: whether on wood or OSB, it takes less than five minutes for a single person to install a Wine Line® module.
Anchors, screws, drill bits: diameters that go together
The most commonly mismatched trio in home improvement. A wall plug is designed to hold a screw of a specific diameter and fits into a hole of the same diameter. If the hole is too wide, the plug slips. If the screw is too thin, the plug never expands.
| Anchor diameter | Compatible screw diameter | Drill hole diameter |
|---|---|---|
| Ø 5 mm | 3 to 4 mm | 5 mm drill bit |
| Ø 6 mm | 4 to 5 mm (including the 5 × 50 mm screw) | 6 mm drill bit |
| Ø 8 mm | 4.5 to 6 mm (including the 5 × 50 mm screw) | 8 mm drill bit |
| Ø 10 mm | 6 to 8 mm | 10 mm Drill Bit |
| Molly M4 (drywall) | Metric screw included with the anchor | 8 mm drill bit |
| Molly M5 (drywall) | Metric screw included with the anchor | 10 mm Drill Bit |
| Molly M6 (drywall) | Metric screw included with the anchor | 12 mm drill bit |
A Molly anchor is therefore not identified by its drill hole diameter but by its thread, and the drill bit changes for each size. Its length must also match the thickness of the sheet metal: if a Molly anchor that is too long is used on BA13 sheet metal, it will not expand properly.
The 5 × 50 mm screw recommended for Wine Line® structures fits equally well into a Ø 6 anchor and a Ø 8 anchor, both drilled with a drill bit of the same diameter. The Ø 6 is the most direct match; the screw operates within its optimal range. The Ø 8 provides more contact surface, and the screw’s 50 mm length is sufficient to reach the bottom of the anchor.
The hole must be about 10 mm deeper than the length of the anchor; this is the value specified in the technical data sheets. For a 25-mm anchor, drill a 35-mm hole; for a 40-mm anchor, drill a 50-mm hole. Debris settles into this extra depth without interfering with the insertion of the anchor.
Always check the anchor’s load-bearing capacity: it varies depending on the substrate and the manufacturer, and it is the only value that is legally binding. The packaging provides a summary of this information; the complete reference can be found in the technical data sheet or technical approval for the exact product. These values also assume that the load is applied close to the wall: they do not account for the lever arm created by a horizontal bottle, which is why it’s important to consider the number of mounting points and the safety margin. The drilling template provided with each structure—which can also be downloaded from the installation page—shows the exact positions of the holes to be marked.

Mistakes That Cause a Loaded Shelf to Collapse
Drilling too large a hole. The most common mistake in practice. Using a size 10 drill bit for an 8-size anchor leaves no margin for error—it eliminates the anchor’s hold. If the hole has already been enlarged, fill it with anchor mortar and let it harden completely, or take advantage of the enlarged hole to install a chemical anchor. Filler, on the other hand, remains far too soft to hold an anchor under load: it comes out along with the filler plug.
Drilling without knowing what's behind the wall. Cables and pipes often run vertically from outlets and light switches. Use a wall scanner before drilling the first hole—especially in the kitchen.
Reuse an existing hole. Holes made by previous occupants are oval-shaped, and the surrounding material is worn. Offset the hole significantly: about 10 centimeters in a solid wall, and more in drywall, where the 40-centimeter center-to-center spacing applies.
Drilling into a joint. On a brick or cinder block wall, the mortar joint is softer than the block itself. A wall anchor driven into a deteriorated joint will give way without warning. Use the sound to locate the layout and aim for the solid part of the block.
Drill into hollow areas. Drill only into hollow bricks, plaster tiles, aerated concrete, and drywall.
Tighten like crazy. With Molly and nylon sleeves, excessive torque crushes the material and prevents expansion. Tighten until you feel firm contact, then stop.
Applying a load too soon after chemical anchoring. The setting time is indicated on the cartridge, and cold temperatures significantly prolong it. Below approximately 5 °C, a standard resin will no longer cure properly; a low-temperature formulation is then required.
Don't overlook the level. A crooked shelf functions asymmetrically and concentrates the load on one side. Check the level with a spirit level before tightening the screws completely.
One last useful tip: Check the fasteners again after a few weeks of use. Sometimes a screw driven into a nylon anchor or wood is a quarter-turn loose. For an already expanded Molly anchor and a chemical anchor, perform only a visual inspection; retightening won’t help and may damage the anchor.
Frequently Asked Questions
Are the anchors included with the wall-mounted bottle holder?
This is rarely done—and for good reason. Wine Line® specifies a 5 × 50 mm screw and provides a drilling template; both of these items are separate from the mounting bracket. The type of wall plug you need depends on your wall: no manufacturer can supply it without knowing the specific application. Purchase it separately after testing the screwdriver.
How much weight can an ankle support?
The question seems simple, but there is no one-size-fits-all answer. The same anchor holds very well in concrete, significantly less well in hollow brick, and even less so if the wall is old. The specified values apply to a reference surface in good condition and to a load applied close to the wall; they are listed on the packaging and, in detail, in the manufacturer’s technical data sheet. For a wine rack, think in terms of the number of anchor points and a safety margin: several well-spaced fasteners are better than a single, oversized anchor.
My wall is old and crumbly, and the anchors won't hold. What should I do?
A classic case of plaster coatings on a deteriorated substrate, where the hole gets larger while drilling and the anchor spins freely. Three approaches, in order. Intentionally enlarge the hole, thoroughly remove any dust, and install a chemical anchor, which anchors itself in the cracks and crevices rather than relying on pressure. Drill through the fragile facing with a longer anchor to reach the load-bearing wall. Finally, install a distribution panel secured at multiple points and screw the shelf into it. The worst option is to keep trying in the same spot.
Can you mount a wall-mounted bottle rack on tile?
Yes, if you go about it the right way. Drill in a circular motion using only a tile or diamond drill bit, and apply masking tape over the hole to prevent the drill bit from slipping. Once you’ve gone through the glaze, switch to a drill bit suitable for the substrate behind it—which, incidentally, is the real issue: tiles don’t support anything; they’re just for decoration.
At what height should a wall-mounted bottle rack be installed?
It depends on the room and its intended use—whether it’s a kitchen or living room, a wine cellar for storage or display. Each situation has its own guidelines, which are detailed in our article on mounting dimensions for a wall-mounted bottle rack. When it comes to mounting, keep in mind that the top mounting point must remain accessible for tightening once the structure is in place.
I'm renting—is there a solution that doesn't involve drilling?
Not for a loaded bottle rack. High-strength adhesives are rated for flat objects pressed against a smooth, non-porous surface—at load levels that have nothing to do with a loaded shelf—and they’re not recommended for porous surfaces, which rules out most painted walls. A few 8-mm holes can be filled in five minutes during the move-out inspection. A falling display case damages the wall much more severely—and takes the collection with it.
A wine collection that grows at your own pace.
Modular wall-mounted shelves in raw or lacquered steel. Holds up to 22 bottles per module, 2-year warranty, free shipping on orders over €350.
Explore the collectionExcessive alcohol consumption is harmful to your health. Please drink responsibly.