How to Build a Wine Cellar in a Garage: A Step-by-Step Guide
An unfinished garage can reach 35°C in the summer and drop below freezing in the winter. For wine, this is the worst-case scenario: these temperature swings can ruin the aromas in just a few seasons. Yet the space has everything it needs to become a great storage area. It offers ample space, direct access, and often a concrete slab that helps stabilize the floor temperature. All that’s left is to properly condition the space, then store the bottles so you can keep an eye on them. Here’s how to proceed, step by step, from the structural work to showcasing your collection.
Step 1: Assess the space and surroundings before you begin
Before you take the first step, take a critical look at your garage. Not all garages are created equal. A garage attached to the house, adjoining a heated room, will have a head start over a detached metal garage facing south.
Take measurements and identify any constraints. Here are a few things to check:
- The available floor space and headroom for the future storage area, taking into account the car if it remains there.
- Existing moisture: stains on the walls, saltpeter, a musty odor. A bad sign that needs to be addressed first.
- Sources of heat: water heater, freezer, south-facing wall that gets afternoon sun.
- Vibrations: motorized garage door, cars driving by, a washing machine in the adjacent unit. Wine doesn’t like to be shaken.
- A clean electrical supply, useful for lighting and potential active control.
This diagnostic step prevents you from building on a flawed foundation. It’s better to know now.
Step 2: Insulate the room to stabilize the temperature
This is the most important step, and the one that’s most often overlooked. Without proper insulation, it’s impossible to maintain a consistent temperature. You need to insulate all six surfaces of the space: the walls, the ceiling, the floor, and the door.
For walls, the standard solution is insulation covered with a drywall partition. In a basement with high humidity, opt for water-resistant materials: extruded polystyrene, polyurethane, or cork. If you choose mineral wool, be sure to install a vapor barrier on the warm side; otherwise, it will become damp and lose its effectiveness. The same principle applies to the ceiling: heat rises, and a poorly insulated ceiling panel will undermine all your efforts.
The floor deserves special attention. A bare concrete slab stays cool, which helps, but laying an insulating layer on top limits moisture from rising up from the ground. Avoid carpet, which traps water and odors.
One last point that’s often overlooked: the door. A standard garage door is a major source of heat loss. Add an insulating panel to it, or install a solid door specifically for that area if you’re partitioning off part of the garage. Proper air sealing does half the work.
Step 3: Ventilate without letting the heat in
Even a well-insulated room needs to breathe. Without fresh air, odors linger and mold can grow, especially in a humid environment. Stale air can also damage the seals over time.
The principle is simple: an air inlet at the bottom and an outlet at the top. Cool air enters near the floor, warms up slightly, rises, and is expelled. This natural circulation is sufficient in many cases.
Protect your openings with a pest screen and, ideally, a dust filter. If the garage is highly exposed to heat or exhaust fumes, a small controlled ventilation system can take over. The idea isn’t to create a constant draft, just to gently refresh the air without disrupting the temperature you’ve worked so hard to stabilize.

Step 4: Controlling Temperature and Humidity
Now we’re getting to the heart of the matter. Wine should be stored within a specific temperature range, and stability is more important than the exact temperature. A cellar where the temperature fluctuates between 8 and 18 °C will cause the wine to spoil faster than a cellar that remains stable at 13 °C.
Here are the guidelines to follow in your childcare setting:
| Setting | Ideal beach | What's happening off the beach |
|---|---|---|
| Temperature | 12 to 14 °C, stable (around 12 °C as a reference) | Too hot: accelerated aging. Too cold: stunted growth. |
| Humidity | 60 to 75%, around 70% | Too dry: the caps shrink, letting air in. Too humid: mold, labels peeling off. |
| Change over time | a few degrees over the course of the year, not per day | Sudden temperature changes can stress the wine (the so-called "thermal shock"). |
With proper insulation, a garage often maintains these conditions for much of the year. Keep an eye on things with a thermo-hygrometer—it’s inexpensive and accurate.
There is one scenario to consider: if your cellar regularly exceeds 18 °C in the summer, insulation alone will no longer be enough. In that case, active temperature control is necessary. A cellar air conditioner (or an electric cellar cooler for smaller spaces) maintains the set temperature even during heat waves. These are specialized units that must be sized according to the volume of the space. No storage system, of any kind, can do this job: storing bottles does not cool the air. Keep these two functions clearly separate in your mind; this will prevent disappointment.
Step 5: Protect the bottles from light and vibrations
Two subtle enemies remain to be neutralized. First, light. It degrades wine and causes a defect known as “light-induced off-flavors,” whether from UV rays or visible blue light; white, sparkling, and rosé wines, which are less protected by their color, are the most susceptible. That’s why bottles are tinted: the colored glass filters out both. In your storage area, limit glass windows and opt for LED lighting, which generates little heat. But no light is completely neutral: true protection comes from darkness. Turn on the lights only when you enter; the rest of the time, keep the room in the dark.
Next, vibrations. At sustained levels, they stir up sediment and can disrupt the wine’s slow aging process; at very low intensities, the effect remains debatable, but it’s best not to take the risk. If the motorized garage door causes the wall to shake, move your storage units away from that area. Place them on a stable floor, away from vibrating machinery. A sound load-bearing wall is better than a partition that resonates every time a car passes by.
These two simple steps don’t cost much but make a big difference in how long food stays fresh.
Step 6: Choose storage options and showcase your bottles
The room is ready. Now for the fun part: organizing the collection. And here, the choice of storage affects both preservation and visual appeal.
Bottles stored horizontally, easy access, and a scalable system
Rule number one: store your bottles on their sides. This keeps the wine in contact with the cork, which stays moist and airtight. If the cork dries out, it lets air in, and the wine oxidizes.
Also consider accessibility. A cellar where bottles are piled haphazardly is a surefire way to forget about the bottles at the back and find them past their prime. It’s better to have a storage system where every label is clearly visible at a glance. And plan for the future: a collection grows over time. A system that can be expanded module by module will save you from having to buy everything all over again in two years.
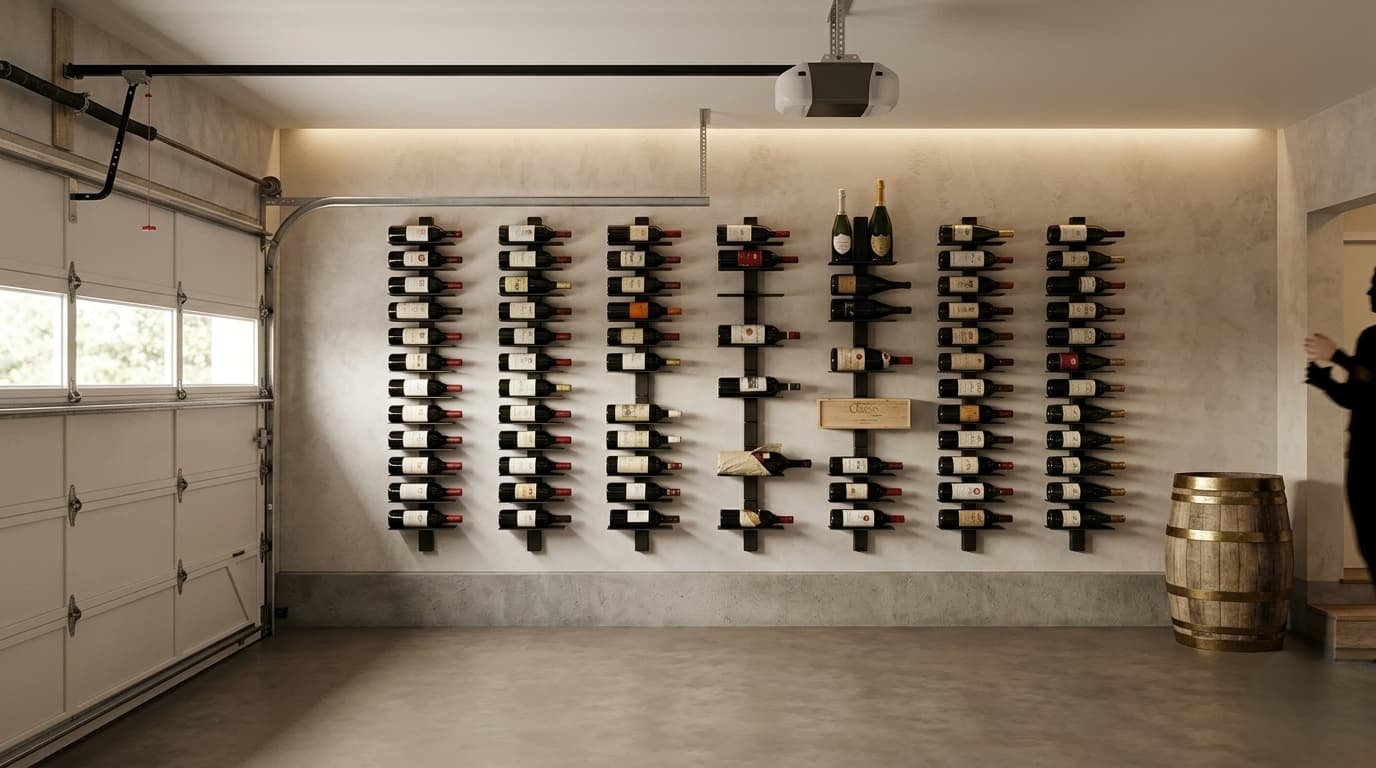
The modular steel wall shelf
To meet these three needs, steel wall storage offers significant advantages in a garage. It frees up floor space—where humidity and cold are most pronounced—and keeps labels visible on the front.
The Wine Line® system consists of 2-mm-thick steel modules mounted on the wall. Each unit (H 118 × W 30 × D 14.8 cm) holds up to 11 bottles on single shelves and up to 22 on double shelves, with a weight limit of 25 kg per unit. Bordeaux, Burgundy, Champagne, magnums: everything fits into the opening.
Steel has a real advantage in a garage. Unlike wood, it doesn’t absorb ambient moisture and doesn’t warp with changes in humidity. This is something to keep in mind, precisely because a garage aims for high humidity levels (up to 70% or more): at these humidity levels, raw steel can rust. In a garage, therefore, a lacquered finish is recommended, as it resists moisture well and remains stable within the target range. The raw finish, with its more authentic, living patina, is better suited for a dry environment.
And as your collection grows, you can simply clip on more shelves or add another unit. No need to start from scratch. The entire range and all compatible shelf sets work together seamlessly over time. For a garage wall, the powder-coated steel version remains the best choice for dealing with moisture.
A steel shelving unit frees up floor space, keeps your labels legible, and expands module by module as your collection grows. Can be mounted on the wall by one person; drilling template included.
Discover the Wine Line® store.
Step 7: Secure your basement and firmly anchor the storage unit
The final step, once the room has been climate-controlled and the collection installed, is to keep it safe. This involves two distinct aspects. On the one hand, you need to protect your bottles from unauthorized access. On the other, you need to ensure that the wall-mounted storage can support the weight without faltering.
Protect your collection. A lockable door deters unwanted visitors and restricts access by children. And if your collection increases in value, make sure your home insurance covers it properly: once your collection is well-stocked, the amount at stake is no longer trivial.
Secure the storage unit. Don’t skimp on installation. A shelf loaded with bottles is heavy—up to 25 kg per module for the Wine Line® system. Use 5 × 50 mm screws and the included drilling template to secure it to concrete, brick, wood, or OSB. On standard drywall, use a backing board (22 mm MDF or OSB) or appropriate anchors: a hollow wall cannot support such a load without reinforcement. The installation guide details the steps to follow based on your wall type. Once properly secured, your wall-mounted wine rack will stay put.
FAQ: Your Questions About Wine Coolers in the Garage
Can you set up a wine cellar in an uninsulated garage?
Not in the long run. An uninsulated garage is directly exposed to seasonal temperature fluctuations, which can harm the wine. You can store bottles there to drink soon, but for long-term aging, insulating all six walls of the space is essential. This is the first expense you’ll need to budget for.
What temperature and humidity levels should you aim for?
Aim for a temperature of 12 to 14 °C, as stable as possible (around 12 °C as a guideline), and a humidity level between 60 and 75%, around 70%. Stability is more important than the exact value: a room with consistent conditions preserves items better than a cooler room with fluctuating temperatures. A thermo-hygrometer allows you to monitor both continuously.
What materials should be used to furnish the space?
For the walls, use a water-resistant insulation material (extruded polystyrene, polyurethane, or cork) covered with drywall; if you use mineral wool, add a vapor barrier. A solid or double-paned door for weatherproofing. Choose a floor covering that does not retain moisture. And for storage, steel holds up better than wood in a garage: it does not absorb moisture from the air and does not warp. In a damp basement, opt for powder-coated steel, which is not affected by high humidity.
How can I store bottles in a small garage?
Think vertical rather than horizontal. Wall-mounted storage frees up floor space and keeps labels visible. Modular systems adapt to the available wall width and can be expanded when you have extra space. Ideal when every square foot counts.
A wine collection that grows at your own pace.
Modular wall-mounted shelves in raw or lacquered steel. Holds up to 22 bottles per module, 2-year warranty, free shipping on orders over €350.
Explore the collectionExcessive alcohol consumption is harmful to your health. Please drink responsibly.